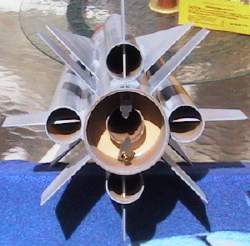
Scratch SA-5 Gammon Original Design / Scratch Built
Scratch - SA-5 Gammon {Scratch}
Contributed by Kevin McLaughlin
| Manufacturer: | Scratch |
 Brief:
This is a scaled down 2.56" x 29mm version of the Blackhawk R&D
3.9" x 38mm kit version coming out in the summer of 2002.
Construction:
Main body tube is 2.56" with four 1.14" booster tubes mounted at 90
degree intervals. Total fin count is 12 made from 1/16" styrene plastic. I
used two 2.56 x 29mm ply centering rings with a 2.56" bulkhead at the root
of the motor mount tube for eyebolt attachement. The bulkhead is perforated
with 8 holes to allow ejection charge gasses to pass to para compartment. I
made this scaled down version from eyeballing photo of Blackhawk's version on
ROI.
I used 1/4" triangle balsa strips to secure the 1.14" booster tubes. This greatly facilitated the centering, mounting and finishing of the booster tubes. I have been using styrene and PVC plastics for fin material for some time in my scratch builds. This greatly speeds up cutting, finishing and painting with good performance. Styrene just needs scoreing and snapping to get the fins ready. The bottom fins and booster tube locations are higher on my version to keep them away from ground impact. I also installed a 2.5" flex phenolic coupler in the butt end to help with landings. All material except styrene for fins was purchased from Rocky Mountain Rocketry.
 Finishing:
A light sanding with 220 grit sandpaper, and you are ready for primer. Finish
was 2 heavy coats of automotive primer followed by a coat of winter grey
enamel. Nose cone is painted tomato red. Based on a 24 oz. finished weight, I'm
looking at a chute size of 36", but will probably go with a 42" on
first flight.
Flight:
 Based on wrasp simulations, I'm
looking at motor ranges of F24-F56. First flight tomorrow will be on an F24-4W
which should hit about 350'.
Recovery:
My shock cord is 10' x 4MM nylon cord anchored to an eye bolt mounted in a
2.56" ply perforated bulkhead. I have been using a technique of
perforating the last three inches of the MM tube to allow exhaust gasses to
pass into a cooling chamber and then move through the perforated bulkhead into
the para chamber. This allows for wadless/heatshield-less recovery.
Summary:
I like the look of the SA-5 Gammon, so decided to build a scaled down version
to fit my local launch site limits.
Other:
I liked the design, as it didn't require too much CA glue. I was able to use
Elmer's for the tube attachements and 5 min epoxy for the fins and internal
motor mount. A new technique I tried was running a finger of silicon calk down
the fin joints to creat a more flexible fin fillet than epoxy. Epoxy always
seems to crack and pull away from fins after a few landing jolts. The silicon
calk can be manipulated with a wet finger for smoothing, then cleaned up with
water. It doesn't sand very well, so go easy on it, and keep it where you want
it.
Sponsored Ads
 |
 |


