| Construction Rating: | starstarstarstarstar_border |
| Flight Rating: | starstarstarstarstar_border |
| Overall Rating: | starstarstarstarstar_border |
| Diameter: | 0.91 inches |
| Length: | 14.90 inches |
| Manufacturer: | Semroc  |
| Skill Level: | 1 |
| Style: | Sport |

Brief:
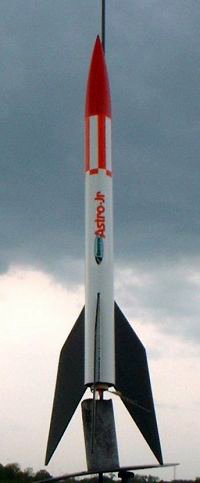
This is a downscale of the 1969 Centuri Astro 1, reintroduced by Semroc in 2004
in a 13mm small field version. While it's a decent value at $8.00 retail, it's
also offered as a free premium at various times on their website or via coupon
included in some of their kits. The swept back fins give this a slightly more
interesting look than the typical 3FNC skill level 1 designs.
Construction:
Semroc kits feature very good quality parts, typically original true scale
Centuri tubes, laser cut fins, and balsa nose cones. This kit was no exception
and the finish on the balsa cone was superb.
Parts list:
- ST-890 body tube
- 13mm motor tube
- Balsa nose cone
- Laser cut fins (3)
- Centering rings (2)
- Engine block
- Engine hook (metal clip)
- Kevlar®+elastic shock cord
- 1/8" lug
- 12" plastic chute kit
- Waterslide decal
Semroc instructions are clear and easy to follow with plenty of illustrations and include good craftsmanship tips such as grain filling and balsa sealing that many budding young builders might not be familiar with. Given the fairly simple construction of this, the kit can be built in about an hour plus finishing time.
Construction begins with the motor mount, which consists of a 13mm tube, a pair of centering rings, a ring block, and the motor hook. One very nice upgrade featured in most (maybe all) Semroc kits is the use of a Kevlar® line anchored to the motor tube, extending out the body tube where you switch to elastic. This makes for a more durable rocket worthy of many flights.
Fins are laser cut, so not much work involved there other than filling the grain. Marking of the tube is accomplished through a template in the instructions. Personally I prefer a wraparound guide, which tends to be less error prone than holding a tube in place on a piece of paper while you mark the lines around it. I attached the fins with CA, then applied wood glue fillets.
The nose cone is attached using a screw eye glued and anchored to the base. As I mentioned in the parts list, this cone was made of beautiful balsa.
The parachute kit is a typical 12" plastic chute, which needs to be cut out. Shroud lines are retained using tape disks, which are a bit easier on the adult fingers than trying to thread the line through a tiny hole and double-knot it. Semroc uses a very high tack tape disk and I have not had any problems with shroud lines in the past.
Finishing:
The header card shows a 3-color paint scheme, which is slightly challenging for
the novice builder but is still fairly straightforward. After applying a couple
of coats of gray primer, I sanded down to nearly a bare tube, effectively
filling tube spirals. I then applied one more coat of white primer followed by
two coats of gloss white. After allowing a couple of days for the white to
fully cure, I masked off the fin area to paint the fins gloss black.
Construction tip: the placement of the launch lug is noted at 1.5" forward
of the aft end of the tube. This will leave the lug aft of the forward end of
the fin root, so you don't have to try to mask over or around a launch lug.
That's a nice touch, as I've been burned several times by lugs getting in the
way of a quality paint job. The nose cone is painted red. I painted it
separately, saving the hassle of masking.
This kit also comes with waterslide decals. I was pleased to see them included as many otherwise fine Semroc kits are without this basic trimming, resulting in a very plain looking rocket. The Astro Jr comes with a checkerboard roll pattern decal as well as a logo decal. I had no problems applying these and found the decals very durable so there should be little chance of breaking or tearing them in application.
Construction Rating: 4 out of 5
Flight:
The 13mm motor mount on this had me scratching my head thinking it would be
severely underpowered as an A10 is the most thrust you can stick in it. I had a
pack of 1/2A3-4s already opened and was pretty pooped from chasing other
rockets in 15mph winds all day so I decided to shoot low on this one.
I was wrong. The 1/2A was enough to send this well over 100 feet. Even though it was a short walk of about 80 yards, it was nowhere near the short walk I'd hoped for. While I'm sure an 18mm upgrade would work fine on this kit, it will have no problems flying on 13mm motors and stay within a typical pair of soccer fields.
Recovery:
The 12" chute is plenty for this although I'd stick with the chute and
avoid swapping out for a streamer. The swept back fins are delicate and this
needs a gentle landing.
Flight Rating: 4 out of 5
Summary:
Very nice flyer and easy to build. I especially liked the inclusion of decals
and a name tag decal. I'd recommend this one for build 'n' flies.
Overall Rating: 4 out of 5
 |
 |
Flights
 |
 |
Sponsored Ads
 |
 |


M.M. (March 16, 2006)