| Manufacturer: | Cycline3 |

(Contributed - by Greg Deeter - 12/01/02)
Picture courtesy of Cycline3 from
eBay
Brief:
This is a single stage rocket made by a company called Cycline3. It is named
the #002b and is described as an "Ultra High Performance Mid Power
Rocket". I ordered it directly from Cycline3, as well as one of their
other kits, the #004 Poison Arrow which I will build next. It looks like I
bought these just in time, as a week later the Cycline3.com website for rockets
stated that they are closed until sometime in 2003. This rocket came with a CD
containing videos of Cycline3 and other rocket launches. I was not expecting
that and it was a nice surprise. Really cool videos with music.
Construction:
This #002b kit came in an Estes-type retail package, a plastic bag with a peg
ready header card. It included an 18" x 1.64" body tube (BT-60),
black plastic nose cone, 1/8" Balsa stock sheet for fins, thin cardboard
for motor rings (A blue index card!), 24mm engine tube long enough for Estes E
engines, 12 foot long heavy duty elastic shock cord, 2 railbuttons, brass snap
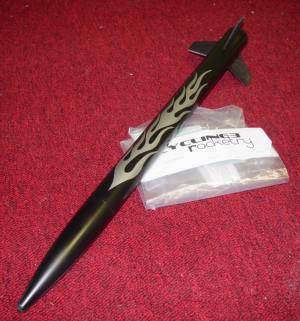
swivel, fabric parachute and a large nice quality silver flame decal which is a
foot long. Also has a nice 6 page 8.5" x 11" manual.
 This
rocket is designed to be built with a very light type motor tube centering ring
unlike any kit I have ever seen. It calls for polyurethane glue and here is
why; The engine centering rings are to be cut with the provided template from a
thin paper index card. No kidding. I was shocked. The manual explains that they
are not load bearing. By design, the load bearing aspect between the motor tube
and body, will be a ring of polyurethane glue for which the index card paper
rings are only a guide. I think that is a very interesting idea yet I didn't go
that way. I used two thin cardboard die-cut centering rings from a Mean Machine
kit. The Cycline3 #002b did not come with a motor clip or thrust ring by
design, to keep it very light as explained in the manual. I went ahead and
added a thrust ring and standard Estes D length motor clip.
In retrospect, I sort of wish I had built this kit as it was designed. In fact I plan on ordering another one and doing just that. The polyurethane motor to body tube centering ring is interesting. I just didn't have any polyurethane glue. And I feel better about having a thrust ring and motor clip in there as opposed to the masking tape friction fit as per the kits design.
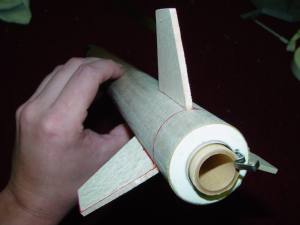
The fins were a snap to cut and the Balsa was good quality 1/8". There was just enough for the three fins. The instructions state "Do not round the edges". No problem.
I did something a little different with this rocket which I have never tried before. I outlined where the fins would mount and then used a very sharp push pin and made (5) holes in the body tube at each fin position. I then applied a generous bead of CA to the fin roots and used an Estes fin alignment guide with clips. When mounting the fins like that, the CA goes into the holes which I believe will make for some strong and secure fins. I also sanded off the glassine layer from the body tube before mounting the fins. Finally I used a two part epoxy putty called FIXIT which I purchased from Apogee, to make some nice fin fillets. The FIXIT epoxy putty can be worked with for over an hour, and it is a self hardening bonding and filling agent with the strength of aluminum.
The kit was complete and fun to build with very good instructions. While I did not go by the instructions, I'm going to have to give it a 5/5 as I don't see any way to improve on how it is intended to be built. My own methods were just by personal choice.
 Finishing:
It's first flight was unpainted. I have since gone with the color scheme shown
on the package and in the CD videos. Black. I was nearly out of primer so it
only got a very light layer of primer. Then gloss black. The silver flame
sticker is the best quality I have ever seen in any rocket kit. You peel off
one plastic side and apply the decal. Then remove the other plastic backing
side. It goes on good and looks very nice.
Construction Rating: 5 out of 5
Flight:
There are no specific recommended motors. The kit just states that it is
designed for 24mm C through F power. It also says on the front of the
package/manual that it goes up to 3500 feet. The instruction manual is one of
the best I have ever seen, as it goes into detail and explains why each of the
suggested construction methods are selected.
I put a few sheets of wadding in it and introduced it to it's first flight motor, an Estes C11-5. It flew perfectly and was very stable. It seems to be crying for a D for the next flight. I might use a 24mm to 18mm adapter and pop in an Aerotech D21-7 Blue Thunder. The fins seem small for a rocket this size but they do the job and it sure does fly straight up, stable and high. One should be quite careful with this one, cause it will most certainly go out of sight. A few tablespoons of construction line chalk on top of the wadding would be a good idea, as to cause a chalk cloud to get an eye on it at ejection. When flying it on a D or above, I suggest at least a 7 second delay.
 Recovery:
This comes with a very tuff, unique and nice quality rectangular light fabric
parachute which is sort of a peach color. It is called a
"Frankenchute". The chute looks very strong and I think the nice
quality 'chute is a superb feature of this kit. This rocket is designed to use
the Estes-type triple folded shock cord mount. It suggests putting a staple
through it and then using epoxy to secure it to the inside of the body. This
kit comes with a 12 foot long shock cord, yes! Now that's how it should be and
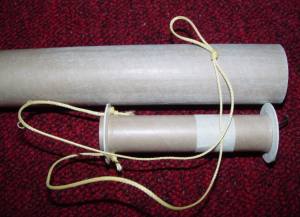
I am impressed. Yes I used my own type of shock cord mount. Using a loop of
Kevlar®
I mounted it on both ends through the top engine centering ring, with some
knots and CA! to keep it in there forever. I then tied a knot about an inch
from the top of the loop so I basically have a dual mount. The Kevlar®
is supposed to be fireproof but even if one side burns through, the other will
still work. I made certain to have this loop and snap swivel about an inch shy
of coming out of the top of the body tube so that the only thing to come into
contact with the body tube will be the attached 12 foot elastic shock cord.
This is just my own dual mounted and zipper-proof favorite method. This is a
lot of stuff and the recovery system will fill the body tube. Packing the chute
right is important with this one.
Flight Rating: 5 out of 5
Summary:
This is a good quality complete kit with excellent instructions. Considering
the power of the motors it is designed to fly on, you might want to have some
binoculars handy. The polyurethane motor ring design is an interesting
technique, and I will build another in order to explore and try that method.
I do not see any faults with this kit at all. It's innovative, flexible, simple and it performs perfectly. I have never seen a rocket kit that comes with a CD of flight videos. This kit I do believe fully deserves a 5/5.
Overall Rating: 5 out of 5
Sponsored Ads
 |
 |


