Hartle Engineering Thermal Rider Parachutes
Hartle Engineering - Thermal Rider Parachutes {Component}
Contributed by John Lee
| Overall Rating: | starstarstarstarstar_border |
| Manufacturer: | Hartle Engineering  |
(Contributed - by John Lee - 03/09/08) 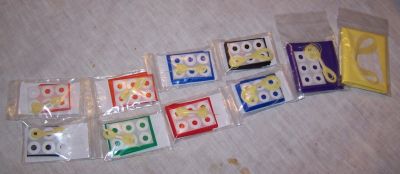
Brief:
For some reason my imagination was always captured by paper rockets such as the Centuri Vulcan. The use of paper opened up so many interesting possibilities for shapes beyond mere tubes and cones with fins. Because that love of paper rockets has stayed with me as a BAR, I recently tried to clone the Centuri Vulcan, my childhood nemesis. That project, and its successors was not without its problems. One of those problems involved parachutes.
The original Vulcan had if I remember correctly, a pretty standard 12" plastic parachute like was commonly produced by Centuri and is still produced by Estes and many other manufacturers today. This posed several problems for me, some of perception and some of construction.
I don't like plastic chutes. I never have liked putting them together. I have never like their frailty. I don't care for the way that any escaping hot gas generally spells disaster. For that reason, and because I am lazy, I usually purchase ready made nylon chutes. Those chutes generally take up more room, even in the thin mil varieties. Therein lies the subsequent problems: there is not a whole lot of room to pack anything in a Centuri Vulcan.
 I tried an Estes 12" chute. No matter what I did, it never deployed. At best, the nose cone would pop off and the chute would come part way out. Even so, the rocket would always recover as a "tumble" that rarely hurt this rocket but did hurt my pride.
My next move was to cut out the spill hole in the middle of the chute. That meant that it did not have to be packed quite so tight but still no luck. The Vulcan must love its chute so much that it is loathe to let it escape from the confines of the body tube.
I figured something even smaller was needed. Since the rocket had routinely survived tumble landings both with and without the nose cone blowing, I did not figure that a 12" chute was mandatory. I resolved to seek a small, probably 8" mylar chute I could pack into a tight space and still have hopes of being deployed. I turned to The Rocketry Forum to post a question about sources.
I got several replies for which I was grateful and then a private message from the proprietor of Hartle Engineering. He offered to send me, free of charge, a selection of the chutes he makes. Since these are plastic chutes, I was happy to get something but not overly thrilled. I sent my address and waited.
Then the chutes came in and my perceptions changed.
Construction:
I was sent a variety of Thermal Rider parachutes. Included in the selection were 2 each of 6", 8", 10", 12", and 16" chutes. There was also a 24" chute included. They came in an assortment of colors.
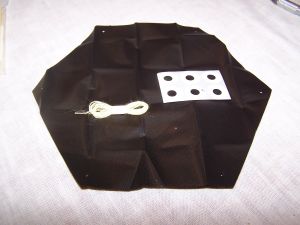
Each chute package contained a simple instruction sheet, a plastic canopy that was pre-perforated for the shrouds, a set of reinforcing rings, and a quantity of line for the shrouds.
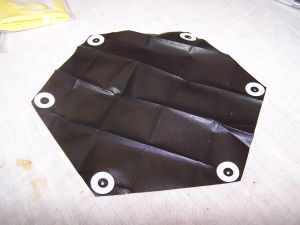
The first thing that jumps out at you upon seeing the chutes is that they are not your normal plastic material. They are a bit thicker and have an interesting texture to them. They are already cut out and they are definitely a lot tougher than your run of the mill plastic chute. Each corner is pierced to accept a shroud line. These are not big holes as would be expected with a hole punch but are small, just a bit larger than the diameter of the shrouds themselves.
Assembly of the chutes is easy. You choose the size you want and open it up. You will find a length of shroud line held in loop by a small fragment of launch lug. You need to cut your shroud to the appropriate length. I will point out here that it is best to count how many you will need and not assume. I made the mistake of assuming and learned the hard way that not all of the Thermal Rider chutes are hexagonal. Almost all of them are but the 24 incher I received is octagonal. That meant that I wound up short one shroud line.
After the shrouds are cut, set them aside for a moment and apply the reinforcement disks to the corners. The central hole of the disk should be approximately concentric with the hole provided in the chute itself. Press the disks on firmly to make sure they adhere well.
Now the shrouds are revisited as they are tied to the corners of the chute. I used bowlines to do this but there are undoubtedly other ways as well to tie them on. You do not want the loop to be too big and neither do you want it to slip and close in upon the corners.
That does it. All that is left is to install it in your rocket using your method of choice.
Flight:
On my first opportunity to log some flights after receiving the chutes, I made sure that I had packed the 6" in the Vulcan. After the rocket reached apogee, I had the novel experience of seeing a parachute deploy and the whole assembly fall gently to earth. I probably could have gotten an 8" in there but 6" was all that was needed.
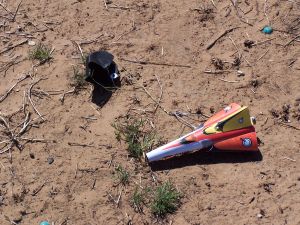 The 12" chute I entrusted to an entirely new rocket. It went into a FlisKits Stingray. Again, it did what it was supposed to without problem and the rocket was flown twice that day.
I was going to try the 24 inch chute in a Hawk's Hobby Super Sprite, but I did not get the time. I have no doubt though that it would have performed admirably.
Recovery:
PROs: inexpensive (even if you don't get them for free), strong and durable, wide color assortment, no cutting, high quality.
CONs: you still have to put it together.
Summary:
These are great chutes available in a wide selection of sizes and colors. They are strong and easy to put together.
Plastic chutes are still not a favorite of mine, but they do have their place. These are the finest plastic chutes I have seen.
Overall Rating: 4 out of 5
 |
 |
Sponsored Ads
 |
 |





M.M. (April 27, 2010)