| Construction Rating: | starstarstarstarstar |
| Flight Rating: | starstarstarstarstar |
| Overall Rating: | starstarstarstarstar |
| Manufacturer: | Hawks Hobby  |

Brief:
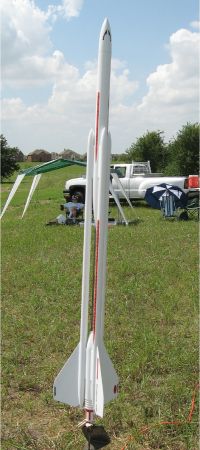
I won the Super Trident at a DARS classic kit contest. This is one huge, fantastic rocket. It flies on 24mm motors
and recovers by parachute. A spacer is included in the motor mount kit to allow the use of either Estes D or E motors.
The rocket stands a whopping 52+ inches tall and has a fin span of 11 inches! Wow!
Construction:
There are a lot of parts in this kit, all top quality too! Also, all of the small parts are contained in plastic
bags, which I greatly appreciate. ST-16 tubes are used for the upper and lower body tubes and there are six ST-8 tubes
that form the pod tubes. The seams in all of the tubes were almost invisible and required very little finishing. The
nose cones are very nice balsa, too--all nine of them! The fins are basswood and laser cut, which is a nice touch. The
quality of the nose cones and fins really shows here as the fit across the rear pod tube/nose cone on all three was
near perfect. They even included angle-cut balsa to reinforce the area of the tubes where the passports were cut for
the ejection charge! The 24mm motor mount fits the longer Estes E motor. The six centering rings are laser-cut
light-ply or basswood (I couldn't tell which), and the motor mount kit includes a 3.75” engine hook. A Kevlar®/3/8”
elastic shock cord combo is included, along with two big 3/16” launch lugs, two hefty eye screws, four couplers
(three for the pod tubes and a larger one for the rear) and waterslide decals. The enlarged decals match the original
perfectly and are exceptionally reproduced. The shock cord was super long as I modified the way it is installed. The
instructions indicate to attach the Kevlar®
cord to the eye screw inserted into the rear of the middle nose cone and then attaching the elastic cord to a loop at
the end. I used my standard tri-fold shock cord attachment to allow inspection of the shock cord, although after my
first launch I don't really think that was necessary with this kit. I do love it though when the manufacturer puts
Kevlar®
in the kit! The deep red, high-quality, 30” ripstop nylon parachute that is included is beautiful, too, and
exhibits the same level of quality as the rest of the kit.
The instruction sheet isn't numbered but does include a ton of helpful illustrations. Some of the instructions are a little difficult to follow and there are some grammatical problems, but there are a number of illustrations included with each step that overcomes those issues. Loretta indicated she was enhancing the instructions for future kits though. The template included for marking the cuts in the tubes for the ejection ports and alignment of the fins is very handy, although it is a little thin and cutting out the circles in the template may be difficult for some. I modified the construction of the motor mount to allow installation of the engine hook using my standard method. Here's the link on EMRR's tip page for the general idea.
This method allows positive motor retention while not having to worry about the hook getting in the way of the delay element when using the AeroTech reload motors. You'll need to adjust the alignment of the upper hold-down ring to allow for the modification. I used a Dremel to trim the upper end of the motor hook to be level with the top edge of the rear hold-down ring. The outer housing structure for the motor mount is a work of art! There are a lot of lines to mark, but all of those rings align beautifully and the coupler joins it all perfectly into the larger rear tube. Putting it together after cutting all the ports in the tubes is a nice break.
The instructions note that you'll need a very large flat surface when constructing the rocket. That is an understatement! When coupling the pod tubes you want to roll the tubes on a flat surface to assure they are aligned together properly. These are very long after being joined, so you need lots of room! Also, as recommended in the instructions, I used a door jamb to assure that the marks for the ports on the lower tube were properly aligned with the upper tube. Of course I double checked the level of the door jamb first. Normally, they are level but you've got big trouble if the marks aren't aligned properly. I only cut ports for two of the pod tubes after measuring the volume the ejection charge would have to fill and considering the variability of the strength of the Estes ejection charges. With the change, the volume was comparable to the volume of an Estes Super Big Bertha.
You also need lots of room when connecting the pod tubes to the upper and lower body tubes. Be sure to follow the sequence in the instructions for installing the large middle and lower nose cones and attaching the pod tubes to the upper and lower body tubes, too. You cannot install the large middle and lower nose cones after the third pod tube has been installed. Another thing to watch out for is to be sure and not get too much glue around the ports when joining the pod tubes to the body tubes or installing the angle-cut balsa over the port joints. The instructions note that your glue should not be within an inch of the ports, a very good idea since many of the original Tridents were built without following this caution. The result: the glue sealed off the ports! Also for this reason, I used JB Weld for all of the fillets as it is thicker and doesn't run.
The fins attached very nicely to the rocket. There is a notch in the root of the fin to align with the nose cone/body tube joint so be sure not to sand this out if you have to sand the root edge for fit. Mine fit near perfectly so it wasn't an issue. I used double glue joints when attaching the fins using yellow glue. I smoothed in JB Weld for the fillets as using epoxy would be difficult due to the slope of the cones.
As is usual on any rocket I build, I installed a length of Kevlar®, which was provided, in a paper shock cord attachment (not provided) with a loop at the end to attach the elastic shock cord. To minimize abrasion from the Kevlar® against the body tube, I soaked in CA around the top 1/2" of the body tube and tied a knot in the Kevlar® to meet the lip of the body tube. Glue on the launch lug, install the screw eye into the upper nose cone (adding weight first to compensate for the largest motor you plan to fly) and attach the shock cord and you're almost done. The launch lugs are glued onto a balsa spacer before attaching to the rocket, which is a nice touch. I laid a piece of sandpaper over the tube and sanded the balsa spacers to fit the curvature and then sanded the edges at an angle to flush with the launch lugs. The parachute was already assembled and had small grommets holding the shroud lines. Plus, it's a very nice parachute.
Finishing:
The balsa nose cones require standard finishing. I used Elmer's Light Fill 'n' Finish but any balsa filler will work
fine. The finishing should be completed before attaching to the rocket since the tubes otherwise get in the way.
Filling in the nose cone/body tube joints and around the angle-cut balsa attached at the port joints was difficult. I
ended up having to come in and fill in areas of the nose cones afterwards. I probably should have covered the cones
with some tape first and then removed it after sanding around the joints. Only a light coat of filler was used on the
fins as the basswood was very smooth after sanding with 400 grit sandpaper. I sprayed the entire model with a light
coat of Kilz to seal off the glue and provide a solid base coat. Next, I lightly sanded the entire model with 240 grit
sandpaper and then sprayed on a coat of primer. Next, sand and primer, sand and primer again, sanding with 400 grit
sandpaper. I painted the entire model with Krylon gloss white and after drying for a couple of days, applied the
decals. The decals went on much easier and laid down much better than I anticipated. They are really big decals for
waterslide! The long decals that go on the pod tubes were scary, however, all but one went on without a hitch. It broke
in a couple of places even though I used dishwashing soap but pieced backed together so that it is hardly noticeable.
They look fantastic! Once complete, I put on a thick coat of Future floor finish to protect everything.
Construction Rating: 5 out of 5

Flight and Recovery:
I only got to fly it on an Estes E9-4 after several months of bad weather. I had just finished building an Aerotech
E18 reload to fly it again when more bad weather hit. With all the extra finishing I did on mine plus weight added to
the nose, it weighed in at 13.9 ounces with everything but the motor--considerably more than the 10.2 ounces specified
on the package. So, I was a little worried about putting it up on the E9 with the almost 40% over-build, but it did
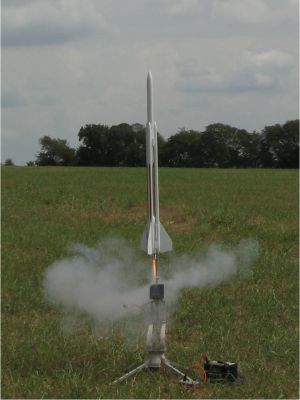
fine. It arced about 20 degrees off the pad, but the chute popped out quickly just beyond apogee and the rocket drifted
down beautifully on the big 30-inch chute. I didn't put any wadding in it and there wasn't even a hint of ejection
residue. It also somewhat confirms that closing off one of the pod tubes from ejection doesn't create any negative
issues while improving ejection capability. She landed without a scratch. However, I had it laid across the table as I
was building the motor when the storm came up. Somehow, one of the pod tubes got a small crimp near the top in all of
the confusion. It blew off the table when the 30mph microburst hit so I'm guessing that's when it happened, but it
looked like it should still fly fine. It was about a month later before I got to fly it again. I couldn't find the E18
so I flew it on the single use Aerotech E15-4, a perfect motor for this kit. It was a much higher flight but still slow
enough that it just looks super cool. Ejection was right at the top, and it drifted down gently on the big chute. After
recovery, I sat it on my table as I went to take some pictures of other happenings at the launch. Yep, the wind blew it
off and it snapped off a fin! I'm a slow learner. When I re-glue the fin, I also plan to fly it on the Aerotech F12
reload motor, which is primarily why I added the nose weight. That should be way cool!
Flight Rating: 5 out of 5
Summary:
The Super Trident is a fantastic rocket. It is hugely impressive on the launch pad and in flight. Recovery on the
large, dark red, 30-inch ripstop nylon chute is a thing of beauty! I love the fact that I don't have to use recovery
wadding, too. Just put in a motor and go! Also, the pricing is excellent when considering all of the parts included. I
am looking forward to my next Hawks Hobby kit.
Overall Rating: 5 out of 5
 |
 |
Flights
Sponsored Ads
 |
 |


