Performance Rocketry Little John (4)
Performance Rocketry - Little John {Kit}
Contributed by Philip Levanda
| Construction Rating: | starstarstarstar_borderstar_border |
| Flight Rating: | starstarstarstarstar |
| Overall Rating: | starstarstarstarstar_border |
| Manufacturer: | Performance Rocketry  |
Brief:
The best and worst part of this kit is that it is minimalist. When you get the
box, there are not a lot of parts. I have it together now and it is probably my
favorite rocket in my fleet. This thing is a tank and it looks great. It is the
only rocket I have that might survive coming in ballistic. That is why I used
it on my L2 test.
Construction:
The parts list
- 1 Nose Cone
- 1 Body Tube
- 1 Fin can
- 1 54mm MMT (There is a 38mm or 54mm option at the time of purchase.)
- 2 Centering Rings
- 1 Bulkhead
- 1 Coupler
- 2 US Army Decals
That's all that comes with the kit. I like this because it lets me do things my way. All the parts are fiberglass and VERY strong.
Parts I added:
- 2 Eye loops
- 1 25' section 9/16 tubular nylon
- 1 Kevlar® shock cord protector (Giant Leap)
- 1 45" Rip stop nylon parachute
- 1 1/4" aircraft plywood centering ring.
- 7oz of nose weight.
- 1 54mm Slimline motor retainer
- 1 54 to 38mm Slimline adaptor
- 2 ACME Conformal 1/2" launch lugs
I used 5 and 30 minute epoxy for the build. Also I used some Elmer's Ultimate Glue in the fin can and nose weight.
I only have one con with building this rocket. All the parts fit tight--too tight. The inner diameter of the fin can varied. You can see ripples in the fiberglass on the inside. I had to do some serious sanding to get almost every part to fit, which I guess is better than too loose but it did require a ton of sanding. Once sanded down, everything went together nicely and fit snugly. There is also some additional sanding you should do: sand the points you will be gluing to add some bite so the epoxy holds better.
 This is a quick building rocket after the sanding is done. I didn't like the
fact that there were only 2 centering rings as I always like 3. I know the
fiberglass rings are super strong, but they are very thin so my brain started
imagining them bending. I added a plywood centering ring I had laying around,
which is probably overkill but what the heck. I put the bottom centering ring
in first and the middle one in the fin can also unglued to keep it centered.
Once I had the lower one epoxied from the bottom, I removed the middle ring and
poured some epoxy in on the bottom one from inside the fin can. Next, I moved
up and glued in the middle plywood ring 3 inches from the top of the fin can.
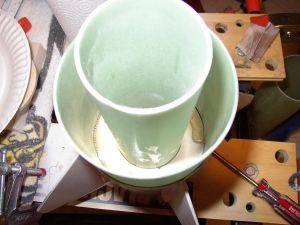
After that was in place, I made a good batch and lined the walls of the fin can
with epoxy. Quickly I slid the coupler in till it sat on top of the plywood
ring in the fin can. Took a few paper towels to clean up the slop. This dried
and I poured in some ultimate glue inside the coupler on the points where the
Coupler met the plywood ring on the inside. This glue expands nicely and is
rock solid. It made a pretty much solid bond which brought the ring coupler fin
can and MMT together. Nothing will knock that MMT loose next to a nuclear bomb.
I drilled and placed an eye loop in the third ring gluing the threads to hold
it. Then, I glued that last ring in about 1/4" from the end of the MMT.
Lastly, I put some epoxy on the inside of the body tube an inch or two from the
end and on the outside of the coupler then slid the BT down on the ring and
coupler with a nice squishy sound.
This is a quick building rocket after the sanding is done. I didn't like the
fact that there were only 2 centering rings as I always like 3. I know the
fiberglass rings are super strong, but they are very thin so my brain started
imagining them bending. I added a plywood centering ring I had laying around,
which is probably overkill but what the heck. I put the bottom centering ring
in first and the middle one in the fin can also unglued to keep it centered.
Once I had the lower one epoxied from the bottom, I removed the middle ring and
poured some epoxy in on the bottom one from inside the fin can. Next, I moved
up and glued in the middle plywood ring 3 inches from the top of the fin can.
After that was in place, I made a good batch and lined the walls of the fin can
with epoxy. Quickly I slid the coupler in till it sat on top of the plywood
ring in the fin can. Took a few paper towels to clean up the slop. This dried
and I poured in some ultimate glue inside the coupler on the points where the
Coupler met the plywood ring on the inside. This glue expands nicely and is
rock solid. It made a pretty much solid bond which brought the ring coupler fin
can and MMT together. Nothing will knock that MMT loose next to a nuclear bomb.
I drilled and placed an eye loop in the third ring gluing the threads to hold
it. Then, I glued that last ring in about 1/4" from the end of the MMT.
Lastly, I put some epoxy on the inside of the body tube an inch or two from the
end and on the outside of the coupler then slid the BT down on the ring and
coupler with a nice squishy sound.
 Before I put the bulkhead in the nose cone, I wanted to test the stability.
Chute, shock cord, and a J350 went in and I checked for the CP. I emailed the
Performance Rocketry to ask about the CP but I never got a response after
several weeks. I punched the dimensions and materials into Rocsim 8.0 and got
the CP, which from the looks of this rocket, it feels about right. I marked
that on the tube and from the balance test could tell we needed a little weight
in the nose. I started dropping one ounce fishing weights in the end till it
balanced out. This is where that Ultimate Glue really works. With the weights
in there, I dropped in a good amount of Ultimate Glue and let it dry. That
stuff expanded right up and over the weights till they disappeared. I love that
stuff. Then I glued the bulkhead in and added an eye loop.
Before I put the bulkhead in the nose cone, I wanted to test the stability.
Chute, shock cord, and a J350 went in and I checked for the CP. I emailed the
Performance Rocketry to ask about the CP but I never got a response after
several weeks. I punched the dimensions and materials into Rocsim 8.0 and got
the CP, which from the looks of this rocket, it feels about right. I marked
that on the tube and from the balance test could tell we needed a little weight
in the nose. I started dropping one ounce fishing weights in the end till it
balanced out. This is where that Ultimate Glue really works. With the weights
in there, I dropped in a good amount of Ultimate Glue and let it dry. That
stuff expanded right up and over the weights till they disappeared. I love that
stuff. Then I glued the bulkhead in and added an eye loop.
That is about it for construction. I didn't add an electronics bay. Loki and Aerotech Js come with delays, and that is what I planned on flying in this bad boy. It can easily handle a K, but I have larger rockets for them. There are a few ways I thought to do it. The nose cone is hollow and could accommodate an electronics bay. For dual deployment, you could also get another coupler, some bulkheads, and try cutting the tube.
Finishing:
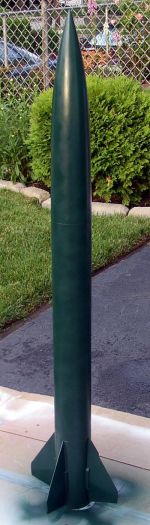
The texture of the tube is a bit rough but holds paint well. I put a coat of
primer on then a nice dark green. The decals went on nicely. I'm an Army vet,
so I love the look of this one.
Construction Rating: 3 out of 5
Flight:
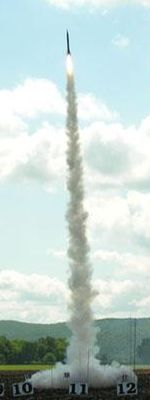
My first flight on this rocket was my L2 cert. Being my certification flight, I
rechecked everything about 50 times before I went to the LCO table. I played it
safe and loaded a J350 into the MMT with the Slimline adapter. This baby roared
off the pad and flew nice and straight. It arched over a bit and the medium
delay popped the chute very close to apogee, maybe just a little past. The
chute was a bit caught up but eventually deployed close to ground. The rocket
hit the ground still moving pretty fast. Since this was my L2 cert flight, I
was a bit worried, but when I got to the rocket, there was nothing but a small
scratch in the paint. I took it to the prefect and got my certification
paperwork signed. It wasn't perfect but I'll take it.
Click here to see a video of the flight.
Recovery:
Since this rocket does not include a recovery system. I'll pretty much leave
this blank. I will say that the nose cone fit into body tube is good with just
the right amount of friction.
Flight Rating: 5 out of 5
Summary:
PROs:
- The fin can makes construction very simple
- Nearly indestructible
CONs:
- Customer Service is very spotty.
- Inside diameter of the fin can is not smooth.
If you like doing it your way and you want a very strong good looking rocket, then this is it. It went together pretty quick and it painted pretty well. I have flown it a few times and it flies straight as an arrow and really rips off the pad on a J.
Overall Rating: 4 out of 5
 |
 |
Flights
|
|
unknown (November 12, 2006)
J.R. (May 24, 2007)
Sponsored Ads


")

 By Douglas R. Pratt")

|
|
unknown (October 19, 2006)