DG&A High Power Rocketry Mini Sonik-Blast
DG&A High Power Rocketry - Mini Sonik-Blast {Kit}
Contributed by Chan Stevens
| Construction Rating: | starstarstarstarstar_border |
| Flight Rating: | starstarstarstarstar_border |
| Overall Rating: | starstarstarstarstar_border |
| Manufacturer: | DG&A High Power Rocketry |
Brief:
Small enough to fly on an LMR, rugged enough to get an L1, this versatile 29mm kit is a good introduction into higher powered rocketry.
Construction:
I won this little bad boy in EMRR's Mach 1-2-3 virtual contest. About two weeks later, the box arrived, complete with a kit label on the outside. The parts were carefully packed, individually wrapped, and very good quality.
Parts list includes:
- Phenolic airframe tube
- Plastic nose cone
- 29mm motor tube
- 1/8" birch fins (3)
- Plywood centering rings
- 30" nylon chute
- Rail buttons
- Quick link/eye bolts
- T-nuts for retention
- Vinyl decal
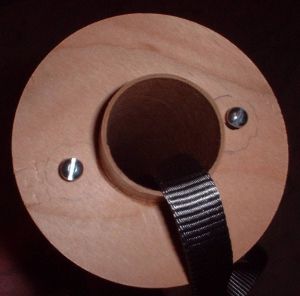
I've only got about 8 high-power capable rockets on my resumé, so most of my comparisons are based on low/mid-power experience. In general, I'm amazed at how little attention is placed on motor retention in high power kits. Given the safety factor, plus cost of hardware, you would think that would be a high priority in kit design. This kit, however, includes T-nuts and detailed instructions for building in positive motor retention.
Instructions were fairly well written with a number of pictures. By high power standards, I'd say they were above average although compared to lower power kits such as FlisKits, Semroc, and the like, they are definitely lacking details. Suffice it to say you should have prior experience and/or a good introductory book on high power rocketry before building this kit.
Motor mount assembly consists of a couple of centering rings and the motor tube with 15-minute epoxy to hold in place. There's an eye bolt attached to the forward ring and the shock cord is then anchored to this. The finished assembly is incredibly strong, especially compared to the plastic nose cone bracket that the other end attaches to.
The fins are thru-the-wall, and you get to slot the body tube yourself. I know some builders find this enjoyable, but I find it a pain. It took a good utility knife blade to score through the heavy duty tube. I epoxied the fins and used thin epoxy for fillets.
 One thing I was very pleased with about the fins are that the forward edge of the root has an angled cutout. Considering my epoxy fillets around the centering ring were a bit large and messy, the cutouts enabled the fins to still fit flush against the motor tube.
Fins and motor tube assembly fit perfectly with no additional trimming or sanding necessary. Very impressive.
I then drilled the body tube for rail button mounting holes and a pressure relief hole. At that point, the rocket was ready to prep for finishing.
Finishing:
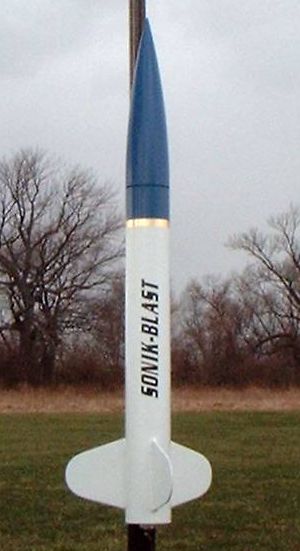
While the body tube was good quality, the "spirals" were more like grooves, and I think I've actually driven on tires with less tread depth. After two liberal applications of wood filler and two coats of Plasti-Cote primer, I still had traces of spirals. I then applied two more coats of primer with light sanding between, followed by 4 coats of Rustoleum gloss white, the last of which was fairly heavy. he result was a nearly perfect finish. I decided to go with a two-tone finish, and topped the upper portion with a nice blue.
The kit includes a nice gold band for trim (and covering any masking flaws between colors. It also includes a couple of fantastic vinyl decals. While the vinyl decals aren't adjustable like waterslide, they look much better. As a result, I'm kicking around ideas for a few custom vinyl decal designs for future projects.
Construction Rating: 4 out of 5
Flight:
While there are a lot of recommended motors, none of the recommendations included delays, nor was there a RockSim file included for quick/easy simulation. Based on an educated guess, I went with a G35-4.
The motor chuffed a little bit then fired up for a nice slow ascent. It weathercocked a bit into the 6-8 mph winds. The ejection was just a hair earlier than the nominal 4 seconds although I think the full 4 would have been a fine delay choice.
Recovery:
I was a bit worried about the 30" chute for this 21.7 ounce rocket but not in the least worried about the durability of the recovery system--heavy-duty anchor bolts and yards of nylon cord are going to last for more flights than I'll ever log.
The slightly early deployment didn't pose any zipper problems, but the rocket came down pretty fast and landed on a small road bisecting the field. On grass, the speed would probably have been fine, but on the pavement, the tip of the nose chipped off. I also suffered a few chips and scratches on an otherwise beautiful paint job. A larger chute wouldn't have helped on the pavement (it would probably have drifted over it though), but I think I'll be using at least a 36" to play it safer on future flights.
Flight Rating: 4 out of 5
Summary:
I think this is a very nice rocket and can handle a wide variety of 29mm motors. Small enough to fly on modest fields with lower F/G power but rugged enough to handle full Hs for certification flights.
Overall Rating: 4 out of 5
Other Reviews
- DG&A High Power Rocketry Mini Sonik-Blast By Greg Deeter
This is a 3 inch airframe version of the full sized (4 inch) Sonik-Blast offered by DG&A High Power Rocketry in Texas. It is a single stage rocket with a 29mm motor tube and the finished weight is considerably lighter than the full sized version. After being extremely pleased with the 4" Sonik-Blast and having flown it on everything from G to I motors, I decided to build this one ...
- DG&A High Power Rocketry Mini Sonik-Blast By Jeff Short
( Contributed - by Jeff Short - 04/01/04) Brief: This is a great entry level MPR/HPR 3FNC rocket that flies on a great range of G and H motors. Modifications: I upsized the motor mount to 38mm from the 29mm that the kit comes with. I just replaced the two 3" x 29mm centering rings with three 3" x 38mm centering rings. I also added a 3rd centering ring. In retrospect, ...
Sponsored Ads
 |
 |


