| Construction Rating: | starstarstarstarstar |
| Flight Rating: | starstarstar_borderstar_borderstar_border |
| Overall Rating: | starstarstarstar_borderstar_border |
| Diameter: | 2.22 inches |
| Length: | 24.70 inches |
| Manufacturer: | Semroc  |
| Skill Level: | 1 |
| Style: | Clone, Futuristic/Exotic |

Brief:
In 1972, Estes offered a very limited run of this design. Sharing many common parts with the Little Joe II, Mars
Lander, and Thor-Agena, it is rumored that the name stands for Spare Parts Elimination Vehicle. Semroc has faithfully
reproduced this, although Semroc apparently lacks the excess spare parts inventory and therefore kits this one up from
scratch.
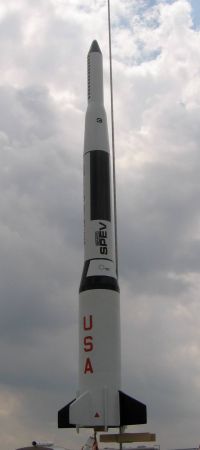
Personally, I think this is one of the ugliest rockets ever offered, but many a BAR appreciates the nostalgic aspects of this and my finished rocket drew many appreciative glances at NSL2007 in Muncie, IN.
Construction:
Semroc parts are excellent quality and stuffed in the baggie you'll find quite an assortment of goodies:
- Balsa nose
- 2 Balsa transitions
- Laser cut balsa fins
- BT-52 payload tube
- BT-60 upper body tube
- BT-70 lower body tube
- 18mm motor tube/centering rings/block/metal hook
- Kevlar®/elastic shock cord
- 12" plastic chute
- Waterslide decals
- 1/8" launch lug

The instructions for this are typical Semroc, well written and reasonably illustrated. One aspect of their booklet I really enjoy but rarely point out is that the first page of their instructions typically contains background information on the original kit as well as notes about Semroc, Centuri, etc. In this case, you get some background on the Estes company and interesting notes about the history of the original design.
Construction-wise, I would probably rate this a skill level 2, though the stock paint scheme can be very tricky, almost Saturn-like, and would bump it up to a level 3. I'm not sure about the total time on this as I worked on a batch of 7 different kits over a bachelor weekend while my wife was out of town, but I would guess you could have this built in about 4 hours plus finishing time.
Motor mount assembly is slightly more complex than a minimum diameter kit. You start by anchoring the Kevlar® shock cord between the metal hook and the motor tube, then slide a 20/60 centering ring over it and secure with a decent fillet. Tape the metal hook in place around the middle, then slide another 20/60 disk up from the aft end. Finally, tack in a 13/20 block and you're done with the subassembly.
The payload section consists of a BT70-60 transition attached to a BT-60, followed by a 60/20 transition, a BT-20, and finally a nose cone. If you're into a grain and spiral free finish, you're in for some work as there's a lot of balsa involved here.
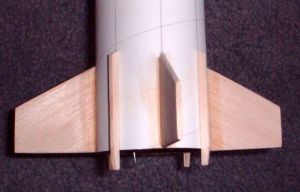
As if the transitions weren't enough to eat into your Elmer's Fill 'n' Finish stock, there are 4 main fins on this plus 4 smaller strake-like fins. I filled and sanded mine first, then bonded to the tube, as even on a BT-70, 8 fins spaced around the circumference still doesn't leave much room to work. Tack in the motor mount then the 8 fins and you're basically done (except for assembling the 12" chute).

Finishing:
As I'd alluded to earlier, this is a lot of work for finishing. Once you've got the balsa and spirals taken care of
(and this is over 2 feet tall), you might opt for the fairly complex paint scheme on the cover sheet. This finish was
achieved through the following steps:
- After satisfactory fill/prep of surfaces, spray entire model white or light gray primer, 2 coats.
- Paint entire rocket 2-3 light coats of gloss white. Allow to thoroughly dry (even if it's dry to the touch, if it smells like paint it's not done).
- Mask off to paint two of 4 main fins black, roll pattern and hatch area (white) on lower transition, 2 roll bars on payload section, and nose cone also a gloss black.
- Nose cone tip gets 1-2 silver coats, possibly more depending on penetration of the black coats.
After allowing a good couple of days for paint to dry, I applied the waterslide decals. The decals are excellent quality--easy to work with, nice print quality, and the clear portion is practically invisible.
Construction Rating: 5 out of 5
Flight:
For the maiden voyage, I decided to fly it at the National Sport Launch in Muncie, Indiana. The field was
outstanding--two square miles of freshly cut grass although a little breezy and given the dry conditions, the ground
was pretty firm.
I went all the way up to a C6-5. Given that my actual weight prior to motor was 2.8 ounces, versus a spec of 2.2 ounces, I felt that the C is by far a better choice. Unfortunately, it didn't really matter--in the 6-8 mph winds, the SPEV arced over to horizontal right after leaving the rod, eventually turning over and pranging onto the gravel road bisecting the field. It was a very unstable flight and there was fairly heavy damage. The nose cone is trashed as is the BT-20 payload tube. I've also got some deep scratches/dents on the two balsa transitions. I intend to repair it though it will bear the scars of this flight permanently.
I'm not sure what led to the unstable flight. Looking over it with Carl on site, my CG seemed right about the correct spot, though at 2.8 ounces, I think my rocket outweighed his Rocksim spec by a good bit (2.2 ounces). It did seem marginally stable so maybe a gust caught it off the rod. With plenty of payload room, I think I'll be adding some clay weight as well.
Recovery:
I can't comment on the recovery, as my rocket deployed while on ground. I think the 12" chute, though, would be
adequate.
Flight Rating: 2 out of 5
Summary:
PROs: nice nostalgic rocket, faithfully reproduced, unusual shape/design.
CONs: marginally stable/unstable. Depending on your taste, possibly ugly design.
Overall Rating: 3 out of 5
Other Reviews
- Semroc SPEV By Frank Casey (March 31, 2007)
Brief: The SPEV (Space Exploration Vehicle) by SEMROC is a Retro-Repro of an Estes kit made back in 1972 in the Model Rocket News, Volume 12, Number 3. It was a limited run and was discountinued that very same year in November, never having made it to an Estes catalog. Construction: Parts list: 1 Nose Cone BNC-52G 1 Body Tube BT-52S 1 Transition 1 ...
 |
 |
Flights
 |
 |
D.W.S. (July 3, 2007)
Sponsored Ads
 |
 |


A.F.N.W. (July 2, 2007)