| Construction Rating: | starstarstarstarstar |
| Flight Rating: | starstarstarstarstar |
| Overall Rating: | starstarstarstarstar |
| Diameter: | 2.34 inches |
| Length: | 38.30 inches |
| Manufacturer: | Semroc  |
| Skill Level: | 3 |
| Style: | Futuristic/Exotic |

Brief:
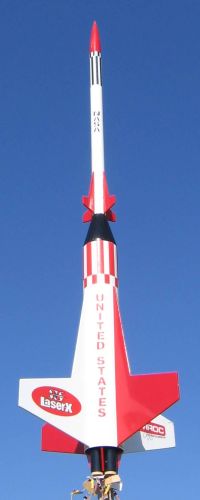
Released just in time for Christmas 2005, this fantastic 1.75x upscale of the
original Laser-X lives up to the buzz. It's a great-looking futuristic design,
able to handle 29mm motors, and features a quick-change motor mount that
converts to 4x18 cluster or 2x24 clusters.
Construction:
The standard kit features:
- Balsa nose cone
- .945" x 16" upper body tube
- 2.25" x 14" lower body tube
- Balsa transition
- Laser cut basswood fins (2 sets of 4)
- 29mm motor mount assembly
- Baffle system
- 24" Nylon chute
- Kevlar®/tubular elastic shock cord
- Waterslide decals
My kit shipped short of a missing the chute, shock cord, motor block, and a number of smaller components. Once informed of the problem, Semroc immediately rushed out the missing parts along with a nice little thank you/apology gift. Semroc's service just can't be beat, as they're truly among the good people in this hobby.
I also purchased the optional 4x18 cluster mount and 2x24 cluster mount, which added a combined $13 to the $39 kit price. Given the quality of the components and design, this is a real bargain folks.
Instructions are typical Semroc: well illustrated, easy to follow, and written for the novice builder. Despite the size and apparent complexity of the motor mount system, I would rate this about a 2 on the 5 point scale for difficulty. It's surprisingly easy to build.
Construction begins with bonding of the 2-piece fins. Each of the 2 sets of fins use 2 part construction to prevent the leading edge from running parallel to the grain. I normally hate building this type of fin, as I invariably have trouble getting everything lined up to my picky standards and frequently wind up with a fairly obvious seam. Not so with these fins. Not only were they laser cut to a perfect fit but there are notched joints where the two pieces come together to make sure you're properly aligned. This was by far the best fit of any 2-piece fin I've ever built.
The baffle system on this is a bit odd. A couple Semroc kits I've built recently included old-school baffle systems consisting of a coupler with perforated centering ring(s), bonded into the body tube. This one sort of follows along those lines, but not exactly. It consists of a perforated centering ring, sized to fit the tube, and a TC-29 coupler that is considerably smaller than the 2.25" body tube. At first I thought this was to align with the motor tube, then I realized the baffle would never reach that far, and it wouldn't match up to the cluster mounts. I asked Carl at Semroc what the purpose of the baffle was, and he replied that still-burning particles tend to go straight, and this was to catch them around the center to prevent them from burning the baffle and/or slipping past it. I'll take his word for it. I hope it doesn't burn, because it's also serving as the anchor for the Kevlar® shock cord.
 Fins are
mounted through-the-wall, sort of. The tabs definitely go through the
pre-slotted tube, but are not intended to mount to the motor tube. Instead,
they act as stops for the interlocking motor mount assembly.
Once the fins are in place, the baffle assembly is glued in from the forward end since it butts up against the forward fin tabs. The kit even includes a long (roughly 6") Q-tip for applying glue down to the fillets. Warning: You do not want to apply glue inside the tube and then push the baffle down. Any stray glue towards the rear of the body tube could prevent the motor mount assembly from sliding in and locking in place.
The upper section is built like a standard 4FNC rocket: a nose cone (weighted with a couple washers), a body tube, and 4 fins (same 2-part design as lower fins). This is then glued to the balsa transition, but you might want to wait until after painting to do this.
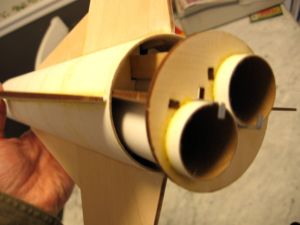
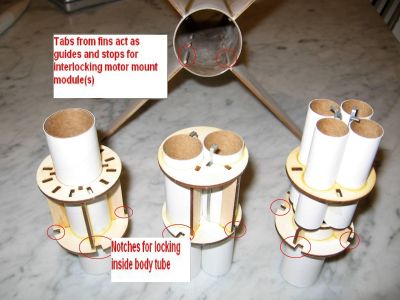
The engine mount is actually the final part of construction on this. The standard 29mm version consists of the motor tube and engine block, all of which is fairly normal. Then you tack on a couple of very carefully placed centering rings. This is still fairly normal. The centering rings though, are plywood and the forward ring has 4 notches along the outer diameter, plus three more along the inner diameter. The aft ring has 15 notches. There are 3 braces that slip into the notches between the centering rings. These act to keep the rings evenly spaced, but more importantly serve as "stops" when twisting the motor mount into the body tube. There are 12 strakes for the aft end, forming an almost boat tail-like appearance.
Orientation of the centering rings is critical to make sure your twist-lock works properly. If you get it backwards, there's still hope but you'll be dealing with a left handed thread orientation.
 The twist-lock
is designed to slip into the body tube with the notches lined up with the fins,
whose tabs slip inside the body tube a bit. Once the assembly is all the way in
(the aft centering ring without notches bumps up against the fin tabs), you
twist it clockwise until the braces on the twist-lock assembly bump up against
the fin tabs. I'm sure I've botched the description a bit, so check out the
photos for a better view.
One thing I should point out about the cluster mounts: the 2x24 mount does not include any lower strakes and in fact the motor tubes only hang out about 1/4" from the aft end of the body tube. The 4x18 includes 4 strakes instead of 12. All cluster mounts include metal engine clips, whereas the single 29mm counts on friction fit.
Finishing:
Normally I rave about the quality of SLS kit materials, which have hardly any
spirals to hide or grains to fill. Other than the lower body tube, this was no
exception. In fact, the lower fins have a beautiful mirror finish to them, and
you absolutely can't spot the seam lines on any of my fins.
The lower body tube though had a pretty deep spiral to it, which took multiple applications of wood filler plus 3 coats of primer sanded between coats to hide. I was pleased with the result but a little surprised that this tube was so much work, especially compared to the other tubes I've gotten from Semroc, which have obviously spoiled me.
I went with the standard paint scheme on this, which is a base coat of glossy white, followed by black transition and red upper fins and nose, plus 2 of 4 lower fins red. I also painted the exposed portions of my motor mount kits black and my strakes red.
One tip on the painting/construction to simplify masking: mask off tiny lines on the motor mount kit (for bonding later) and pre-paint the strakes and (exposed) motor tube, gluing them on after they're dry. Also, don't glue the upper tube to the transition until after each is painted.
Looking at this kit versus the original Laser-X, I think the SLS has cheated on a couple of color choices. The red nose cone looks goofy and I'm going to repaint it black to match the original. Also, the original has 3 red/1 white lower fins, however, I like the 2 red and 2 white fins better on the SLS.
The waterslide decals for this rocket are pretty thin but easy to work with if you're careful. I was very impressed with the clear portions, which are practically invisible. I was also impressed by how well the roll patterns fit. Normally they are slightly oversized leaving a little overlap, and the overlap rarely matches up bars in the pattern. Not so with this kit--there was definitely one extra bar of overlap but it lined up perfectly, so you really can't tell where the wrap starts and stops.
Final weight on this came in at 10.8 ounces, quite a bit over the spec of 8oz on the header card. I'm wondering if the header card was based on not having any motor mount installed and also possibly missing the nylon chute.
Construction Rating: 5 out of 5
Flight:
As I was prepping for the trip to the field, I was bummed to discover that the
only 29mm single use or reloads I had were full Fs and higher, which would have
sent this well over 2500 feet. This was more than I wanted to hit on a day with
8-10mph winds and only about half a mile of field to work with before
encountering concrete.
I skipped the 29mm configuration and started instead with a clustered pair of D12-5s. Both lit, and it zipped off the pad surprisingly quickly. It weathercocked just a bit and didn't appear to roll any on the way up.
Ejection was just after it turned over, and the 24" nylon chute deployed fully.
For the second flight, I went with the 4x18mm cluster using C5-3s. I had picked up a large assortment of older motors, including these, and the age seemed to be a factor as only 2 lit immediately and a third lit as it was starting to lift off the pad. The flight path was a little wobbly but still basically straight up, although it only went about 300 feet or so.
Ejection on the 3s would probably have been a bit too early, but one of these in particular seemed to blow at 1, resulting in very early deployment of the chute. This is a tough bird though, and it came back without a scratch.
Recovery:
The 24" nylon chute is very good quality, and I had no damage on either
flight. I will probably up this to a 27" just to make sure it comes down
gently, as this is a great looking design and I don't want to stress out any of
the fins on landing.
Flight Rating: 5 out of 5
Summary:
I can't say enough about this design. It's the best thing to come out of Semroc
yet, and that's saying something. The interchangeable motor mounts and baffle
system is a great idea. I had two stacks of motors loaded at home, so in the
chilly air at the field, I was quickly able to prep and load for flight #1 and
the second flight prep took less than a minute only having to swapping out the
motor mount and packing the chute back in.
It looks great, flies great, has innovative construction ideas, and can be had for $35-50. You just can't ask for more anything more than that. Now if only they'd get off the stick and get the Saturn 1b and Mars Landers released...
Overall Rating: 5 out of 5
Other Reviews
- Semroc SLS Laser-X By Bob Harrington
Brief: The Semroc SLS Laser-X us an upscale of the classic Centuri Laser-X, which is also now produced as a Retro-Repro by Semroc. It is a single stage design that can accept a 29mm motor as well as 2 x 24mm or 4 x 18mm clusters utilizing interchangeable motor mounts. Construction: The kit consists of the following parts: Detailed illustrated construction manual Balsa ...
 |
 |
Flights
Sponsored Ads
 |
 |


