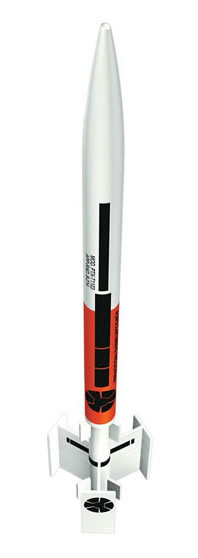
| Construction Rating: | starstarstarstarstar_border |
| Flight Rating: | starstarstarstar_borderstar_border |
| Overall Rating: | starstarstarstarstar_border |
| Published: | 2010-07-06 |
| Diameter: | 1.33 inches |
| Length: | 24.50 inches |
| Manufacturer: | Estes  |
| Skill Level: | 2 |
| Style: | Futuristic/Exotic |

Brief:
This is a skill level 2, 18mm motor rocket. Recovery is via an 18" red plastic
pre-assembled parachute. This is one of the Classic Series offered by Estes.
Construction:
The two body tubes are glassine paper tubes. On this kit, the tube spirals were
practically non-existent. The fin material was laser cut balsa, and the nose cone was balsa.
The instructions were easy to follow. However, I recommend that you read them all the way through first to plan your construction. Another tip would be to test fit any areas where the paper rings are used since they can be a very tight fit, especially when using wood glue which tends to get sticky really fast. A little bit of fine grit sandpaper is all that is needed in order to make the fit a little easier.
Here is my list of the "gotcha's" that I ran into:
The launch lug and fin lines that I drew with a pencil wiped off of the lower body tube very easily. I ended up eyeballing the fin alignment and it still turned out well.
Sliding the centering rings onto the lower body tube was next to impossible without sanding the insides of the rings to make them fit.
The instructions call for attaching the dorsal fins and main fins before inserting the engine mount. I chose to install the engine mount first since it would be difficult to do with all of the fins in the way.
After attaching the dorsal fins I decided to attach the lower body tube to the upper body tube. Once again, this was done since you need something to hold on to while connecting the two tubes together. Once the two tubes were joined, I then attached the main fins.
In addition to not following the instructions in the exact order, I chose to tie a Kevlar® line to the motor mount. I made a loop to attach the supplied rubber band shock cord to it. I also put a thin layer of CA around top of the upper tube, and put a strip of masking tape on the Kevlar® to try to prevent zippering. I will keep a close eye on the shock cord to check for wear. The last modification I made was to use a snap swivel on the parachute.
Finishing:
I would recommend sealing the fins before attaching them. Once all the fins are in place, it
would be very tedious to try to sand them when they are in place.
I decided not to paper or CA the fins to strengthen them. I skipped this due to the fact that this is my nephew's second rocket and he was very anxious to complete construction so it could be flown. Time will tell if this was a wise decision on my part.
Construction Rating: 4 out of 5
Flight:
Not flown yet.
Flight Rating: 3 out of 5
Summary:
Pro's: This is a great looking rocket with an easy paint scheme if you choose to copy the
package artwork.
Con's: Minor problems with the fit of the rings. The order of assembly if followed would be difficult to get the motor mount installed, or attach the two tubes together. You have to have something to hold onto.
Overall, this is a skill level 2 rocket but I would probably rate it as a skill level 3. This is due to the fact that if you followed the instructions exactly, you may have difficulty working around the fins at certain points during construction. However, most builders should be able to work around this if they take their time and think things through.
Overall Rating: 4 out of 5
Other Reviews
- Estes Photon Disruptor By woody (February 23, 2011)
Kit #3025: The Photon Disruptor by Estes is a Sci-Fi stylized, multi-finned interstellar torpedo carrying a Radiation Flux-tipped warhead. Built by the Space Weapons Division (SWD), it is designated variant: Mod ptx-t1103 APP-RAD. 8-214. Components In the Estes Photon Disruptor kit #3025 there are two main body tubes, an upper body tube BT-55 at (34.5cm) long, and a ...
 |
 |
Flights
Sponsored Ads
 |
 |


