| Construction Rating: | starstarstarstar_borderstar_border |
| Flight Rating: | starstarstarstar_borderstar_border |
| Overall Rating: | starstarstarstar_borderstar_border |
| Manufacturer: | Starlight Rockets |
| Style: | Ring/Tube/Cone Fin |

Brief:
A nice size payload LPR with an inventive stair step tube fin configuration.
Recovery is by 12" mylar parachute. Starlight kits are not categorized by
skill level, but I would consider this a skill level 1 kit.
Construction:
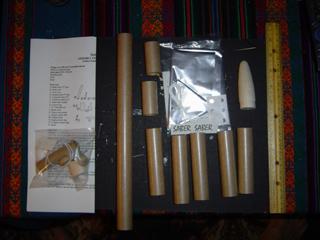
The kit contains:
- 1 12"x 1" body tube
- 4 4"x 1" body tube
- 2 2"x 1" body tube
- 1 0.976" engine mount tube
- 1 balsa nose cone
- 1 balsa tube coupler
- 1 engine block ring
- 2 engine mount rings
- 1 launch lug
- 1 shock cord mount
- 24" shock cord
- 1 engine hook
- 1 screw eye
- 1 decal sheet
- 1 12" mylar parachute sheet
- 1 length of shroud line
- 1 sheet of tape discs

The Starlight Saber's build and flight instructions are printed on 3 panels of 8.5" x 11" paper with very basic illustrations. The display card indicates that the body tube is pre-marked to ease fin alignment. This is correct on other Starlight kits with balsa fins but is not true on the Saber. Having some previous build experience, this did not throw me, but it may confuse some. It is the display card however and should reflect the features of the kit accurately. The build is very straightforward however, and if the builder has any experience with tube rockets and works on a flat surface, he or she will have no problem assembling this kit.
 First the motor
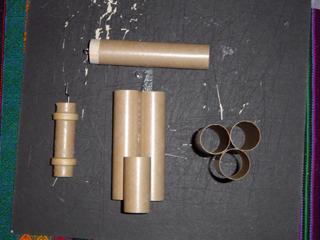
mount is assembled in the standard fashion with a 1/16" diameter wire
engine hook, thrust ring, and centering rings installed, glued, and set aside
to dry. Next, the payload section is assembled terminating its aft end with a
balsa block and screw eye glued in place. The tube fin assemblies begin with
two sets of 4" x 1" tubes being glued together and set aside to dry.
On a flat work table, the tubes are easy to align, however, my four 4"
tubes showed a variance in length by about 1/16" of an inch. It didn't
really bother me but some may choose to sand the ends uniform. The 2 partial
tube assemblies are set aside to dry and the dry motor mount assembly is now
installed in the primary body tube. The cardboard centering rings needed a
significant amount of sanding to accomplish installation without damaging the
primary tube. This may have been due to swelling from natural humidity changes.
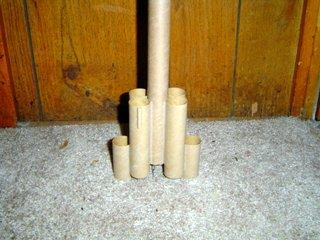
The 2" long tubes are now glued to the 4" long tube assemblies with
1/2" of overhang. Once the 2 completed tube fin assemblies are dry, they
are glued to opposite sides of the body tube with a 1/2" of overhang and
the engine hook centered between them.
The launch lug is then attached to the upper side of one of the 4" fins, which places it to the outside of the rocket's structure as opposed to centered on the primary tube. The round elastic shock cord is attached inside the body tube with a Harry Stine-style three hole shock lock mount. The mylar parachute is assembled stock with tape discs. I chose to thread and tie the shroud lines through the mylar which I reinforced on both surfaces with notebook reinforcements.

Finishing:
The nose cone is the only component which requires sanding sealer (2-3 coats)
as the fins are all tubes. The spirals were tight enough to my satisfaction to
not require sealer. The instructions say to paint the Saber silver if you want
to match the rocket on the cover, while the display card looks like silver
fading to deep blue. I chose to paint the Saber silver, copper, and black to
accentuate its stair step design. The decals consist of two name decals printed
on adhesive paper. When applied, the backing paper is not transparent and looks
blocky over the paint. I felt that their appearance degraded the elegant shape
rather than enhancing the look of the overall model so I chose to leave them
off. Two coats of acrylic gloss and the Saber looks nice.
Construction Rating: 3 out of 5
Flight:
The Saber is prepped like most LPR rockets with 3-4 sheets of recovery wadding.
Recommended motors are A8-3, B6-4 and C6-5. The motor hook is 1/16 inch round
piano wire and it holds the motor secure just fine. As mentioned in the build,
the launch lug is mounted 1 1/4" to the outside of the center of the
primary body tube on a fin. In my opinion there is no reason to not mount the
launch lug centered on the primary tube. Flights on A, B, and C motors all had
a significant, although not dangerous, arc and caused the launch rod to whip
moderately. Given the large surface area of the tube fins, the gentle wind may
have been responsible for some of the arc so I wouldn't recommend launching the
Saber in moderate to heavy winds. I feel it's more likely the offset of the
launch lug which is the cause of the arced flights and rod whip. On the C6-5,
the Saber had it's smoothest, straightest flight and reached an altitude of
about 250-300 feet. I suspect the surface area and drag of the 6 fin tubes is
what keeps this rocket lower in altitude. I may move the launch lug to the
center and report back. I think this would improve stability on takeoff thereby
also increasing altitude.

Recovery:
The mylar parachute is attached by a Harry Stine style shock lock mount. The
12" parachute slowed the descent of the Saber appropriately without the
model drifting too far in a gentle wind. After three flights the recovery
system showed no sign of damage or wear. The combination of the mylar parachute
and the tube fins make the Saber a great rocket to fly in colder temperatures.
Mylar parachutes open more reliably in temperatures below 40 degrees F and the
tube fins are durable when landing on frozen ground.
Flight Rating: 3 out of 5
Summary:
This is an easy to build rocket right out of '50s sci-fi. The instructions and
materials are average but at a retail price of around $8.00, I consider the
Saber to be a good value. The end product is tall and sleek and flies
reasonably well. If you fly in small to medium fields, you may appreciate the
lower altitude fully visible flights that the Saber offers.
Overall Rating: 3 out of 5
 |
 |
Flights
Sponsored Ads
 |
 |


